Tutorial: Installation of Magento on Dreamhost
If you have a hosting plan on a Dreamhost shared server and are trying to set up the Magento e-commerce package, you are probably having some problems. Granted, Dreamhost shared servers have some limitations, but that is not a reason to give up completely. Installing Magento on Dreamhost is not only possible, but actually pretty simple using the command line interface (CLI). The reason is that Dreamhost shared hosting has certain built-in limitations on the amount of time a PHP script can process, and the installation of Magento times out before it is complete. Since the command line is A LOT FASTER than running scripts over HTTP, the installation will not time out.
When I was first looking to set up Magento on Dreamhost, I found an article and forum thread on the Magento website that were on point. But they first assume that you know how to use the command line or even know what it is. When I was more of a newbie at web development, I would get frustrated at explanations that gave you the code, but didn't explain how or where you were supposed to implement that code.
I wrote the tutorial below trying not to assume anything. Better yet, I'll be explaining how to set it up in a sub-directory (e.g. http://www.examplesite.com/store/). I would recommend setting it up in a sub-directory because you may want to use other packages for other parts of your site and installing different packages in the same directory will cause problems. For example, you may want to install WordPress for your news at http://www.examplesite.com/news/.
What I'll be using:
- Windows 7
- Dreamhost Web Panel
- PuTTY (command line interface tool)
- Notepad++ (text editor)
STEP 1: Log in to your DreamHost Web Panel
Go to the Dreamhost web panel and sign in with your username and password.
STEP 2: Create a blank database
In the left column of the administration panel, click the Goodies -> MySQL databases tab. Near the bottom of the MySQL databases page you will find the "Create a New MySQL Database" section.
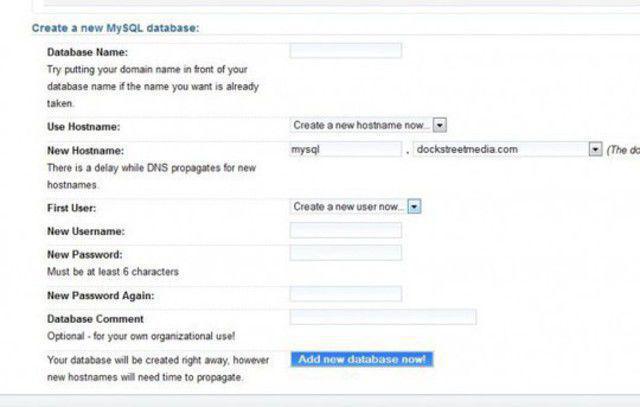
In the Database Name field, enter a name for your database. You must select a unique name across the entire shared server, so select something like YOURSITE_magento - replacing YOURSITE with the name of your site (e.g. examplesite_magento).
Next, select your hostname. If you do not already have your hostname created, then create a new hostname. I would suggest mysql.examplesite.com.
Select your First User. If you don't already have one, create a new user. NOTE: this is not the same as your FTP user or your Dreamhost login credentials. If you create a new user, you must also create a password for the user. Make note of the username and password since you will need it later.
Finally, click the "Add New Database Now" button. It may take 10 minutes or more for the database to be created.
STEP 3: Check to see if your user has shell access
In the Dreamhost administration panel, click the Users -> Manage Users tab. You will see at least one user. If you see "shell" under the type column, then you can skip to the next step. If not, click the edit link on the far right. In the User Account Type field, make sure "Shell account" is selected and save your changes.
STEP 4: Download PuTTY (command line interface tool)
Go to the PuTTY downloads page and get the download for your computer. I get the putty.exe link next to the top PuTTY choice. Place the downloaded file on your desktop.
STEP 5: Log in to your Shell account using PuTTY
Click the putty.exe file on your desktop. You should see the interface window below:
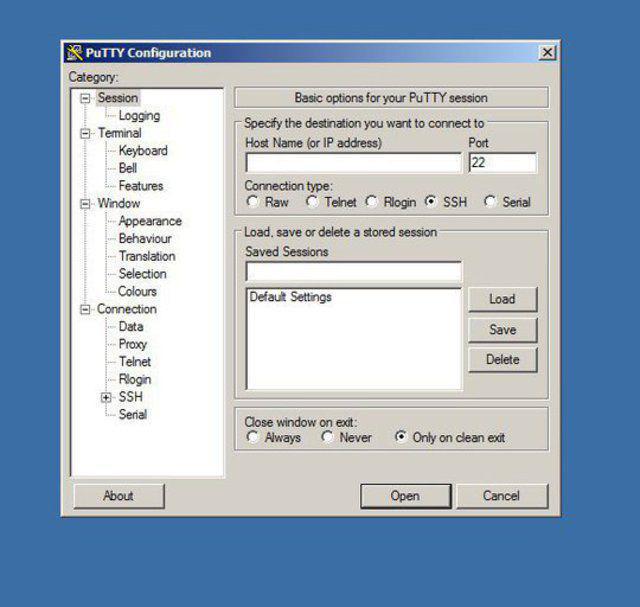
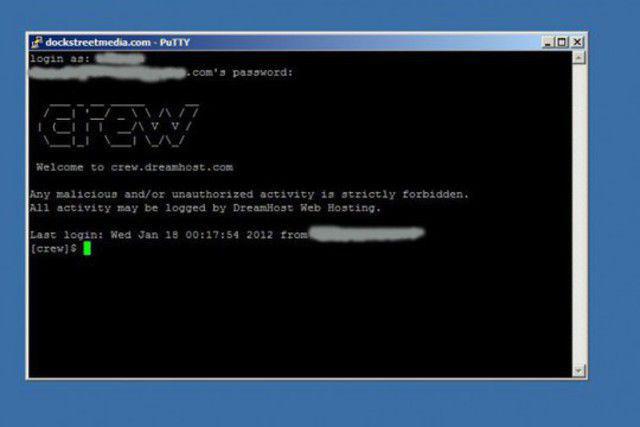
In the Host Name (or IP address) field, enter your host name. With Dreamhost, this value will be your domain name (e.g. examplesite.com). Let the other fields alone and click the "Open" button on the bottom. You should get the command line screen below:
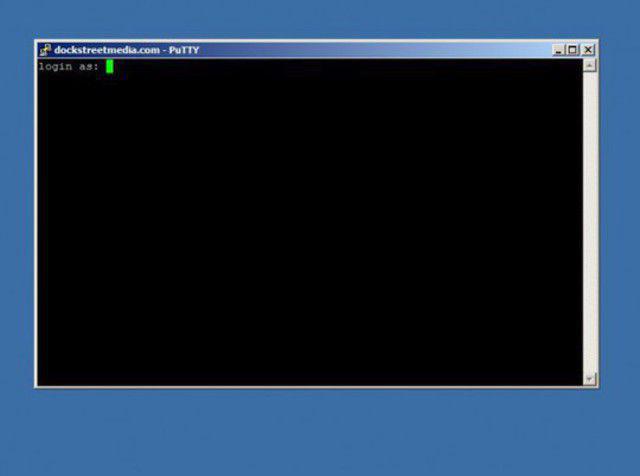
Enter your username first and click the return button. You will then get a line for the password. NOTE: while you are typing the password, the cursor will not move and the characters will not show up, but if you enter your password correctly, you will get a success dialog like the one below:
STEP 6: Create your sub-directory
The first thing to know about the command line is how to navigate through your directories. Type "dir" and click Enter to view your top-level directories. To change to one of those directories, type "cd DIRECTORY_NAME" and replace DIRECTORY_NAME with the directory where your domain points (e.g. "cd examplesite). Type "dir" again and you will now see the contents of the directory (if there are any). To go back up the directory structure use the command "cd .." keeping in mind to include to two periods.
Now, create your sub-directory. Change into the directory where you would like to install Magento using the "cd" command above. Create a new directory using the command "mkdir store" - where "store" is going to be the name of the folder where Magento is stored and the sub-directory in your site that points to it. Use the "dir" command to see if the directory was successfully created.
Finally, use the command "cd store" to change into the new directory.
STEP 7: Install Magento with PUTTY
The Magento website has detailed instructions on how to run a full install with the command line, but I am going to re-publish it for the sake of ease.
NOTE: you can cut-and-paste into PuTTY by selecting the text you want to copy on your computer, right-click select "Copy" and then simply right-clicking on the command line cursor in PuTTY.
First, get the zip file of the full install of the Magento by typing in the command below:
wget http://www.magentocommerce.com/downloads/assets/1.6.2.0/magento-1.6.2.0.tar.gz
Next, unzip the file with the following:
tar -zxvf magento-1.6.2.0.tar.gz
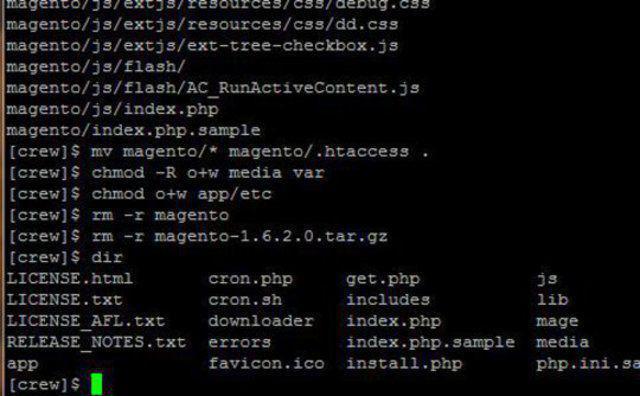
When the zip file unpacks, it moves everything into a /magento directory. To move the contents up to your current directory (i.e. /store), run the following (including the period at the end):
mv magento/* magento/.htaccess .
Then, change the permissions on the necessary directories but running the following commands (separately):
chmod -R o+w media var chmod o+w app/etc
Finally, delete the empty /magento directory and the zip file by running these commands:
rm -r magento rm -r magento-1.6.2.0.tar.gz
The image below is a screenshot of the commands described above:
STEP 8: Go through the command line installation wizard
This is the key to the installation. Magento suggests using the web-based installation wizard by loading http://www.example.com/store/downloader in your web browser. Do NOT use the web-based installer. This is the main cause of the problem in Dreamhost. Instead, use the command line installer with the commands below. Cut and paste the code below into a text editor and change the values of the config variables in quotes.
/usr/local/php5/bin/php -f install.php --
--license_agreement_accepted "yes"
--locale "en_US"
--timezone "America/Los_Angeles"
--default_currency "USD"
--db_host "mysql.examplesite.com"
--db_name "your_db_name"
--db_user "username"
--db_pass "password123"
--db_prefix ""
--admin_frontname "admin"
--url "http://www.examplesite.com/store"
--use_rewrites "yes"
--use_secure "no"
--secure_base_url ""
--use_secure_admin "no"
--admin_firstname "John"
--admin_lastname "Smith"
--admin_email "you@examplesite.com"
--admin_username "admin"
--admin_password "password123"
When you click return, the command may run for a little while. When it is complete, you will see a message like this:
SUCCESS: 90de9490f9b2389480340d7c450ede0
Navigate to the location where you installed Magento (e.g. http://www.examplesite.com/store), and you should see the front end of the installation. To navigate to the administration panel, go to http://www.examplesite.com/store/admin and use the username and password from the admin_username and admin_password values that you set above. The rest is up to you.
My first few experiences with shell/command line/SSH were miserable. I was forced to use it for one thing or the other and I just couldn't understand why the whole process couldn't be easier. When you start to get it working, you discover its power and ease in doing everything from installing packages to batch resizing images - and may even begin to prefer it over slower methods.
Feedback welcome.